

Graduation is a significant milestone, and what better way to celebrate than with a beautiful, festive balloon arch? A balloon arch adds a touch of elegance and excitement to any party, and it’s the perfect way to frame your event space. In this guide, we’ll walk you through the steps to create a stunning balloon arch for your graduation party. Plus, we’ll introduce House of Party—a brand that offers high-quality balloon supplies to make your arch even more special.
Why Choose a Balloon Arch for Your Graduation Party?
A balloon arch serves as the perfect centerpiece for any graduation celebration. Here’s why:
- Eye-catching: A balloon arch instantly draws attention and makes your party stand out.
- Versatile: You can customize the colors, style, and size to match your party theme.
- Affordable: Compared to other large-scale decorations, balloon arches are relatively inexpensive and can be made at home with some effort and creativity.
- Fun and Festive: Balloons bring a sense of joy and celebration, making them an ideal decoration for graduation events.
Now that we’ve established why balloon arches are perfect for graduation parties, let’s dive into how you can make one yourself!
What You Need to Make a Balloon Arch
Before starting the creation of your balloon arch, gather the following materials:
Materials List:
- Balloons: You’ll need a variety of balloons, typically in your school colors or the theme of the party. Choose latex or foil balloons.
- Balloon Arch Kit: You can purchase a pre-made kit, or create your own frame using PVC pipe, a fishing line, or balloon strip.
- Balloon Pump: To save time and effort, use a balloon pump rather than inflating them by mouth.
- Fishing Line or Balloon Tape: To attach the balloons securely to the frame.
- Command Hooks: For easy installation of the arch on walls or ceilings.
- Balloon Weight: To secure the base of the arch.
- Ribbon or Decorative Accessories: To give your arch that extra touch of elegance (optional).
Step-by-Step Guide to Making Your Balloon Arch
Step 1: Plan Your Arch’s Shape and Size
Start by deciding on the dimensions of your balloon arch. Will it be large enough to walk through, or more compact to decorate a table or doorway? Measure the space where you plan to install the arch.
For a classic arch, aim for about 7-8 feet wide and 6-7 feet tall. For a smaller arch, you can adjust the size accordingly.
Step 2: Inflate Your Balloons
Next, inflate your balloons using a balloon pump. Keep the sizes consistent for a uniform look, or mix in a few different sizes for a dynamic design. If you’re using multiple colors, plan your arrangement in advance.
It’s recommended to use a mix of smaller (5-8 inch) and larger (10-12 inch) balloons for variety.
Step 3: Assemble the Arch Frame
For a DIY frame, you can either use PVC pipe to create a free-standing structure or a balloon strip (available from party supply stores) for a simpler solution.
- PVC Pipe Frame: Cut the pipes to the desired length and bend them into a semi-circle. Use connectors to stabilize the structure.
- Balloon Strip: If you’re opting for a quicker option, attach the inflated balloons to the strip by threading the balloon knots through the holes. The strip will provide structure and support.
Step 4: Attach the Balloons to the Frame
Once your frame is set up, start attaching the balloons. If you’re using a balloon arch strip, simply slide the balloons onto the tape.
For a PVC pipe frame, tie the balloons together in pairs (two balloons per cluster) and attach each cluster to the frame using fishing line or balloon tape.
Alternate colors and sizes to achieve a balanced, eye-catching design.
Step 5: Secure the Base of the Arch
Once your arch is fully assembled, it’s time to secure it. Attach a balloon weight to the bottom or use a stand to keep the arch from tipping over. If you’re hanging the arch from the ceiling or wall, use Command hooks for an easy and non-damaging installation.
Step 6: Add Decorative Touches
Now that your arch is complete, you can add some finishing touches! Here are a few ideas:
- Tassels or Streamers: Hang them from the bottom of the arch for extra flair.
- LED Lights: Wrap fairy lights around the arch for a glowing effect.
- Graduation Decorations: Add small graduation-themed items like caps, diplomas, or photo frames to personalize the arch.
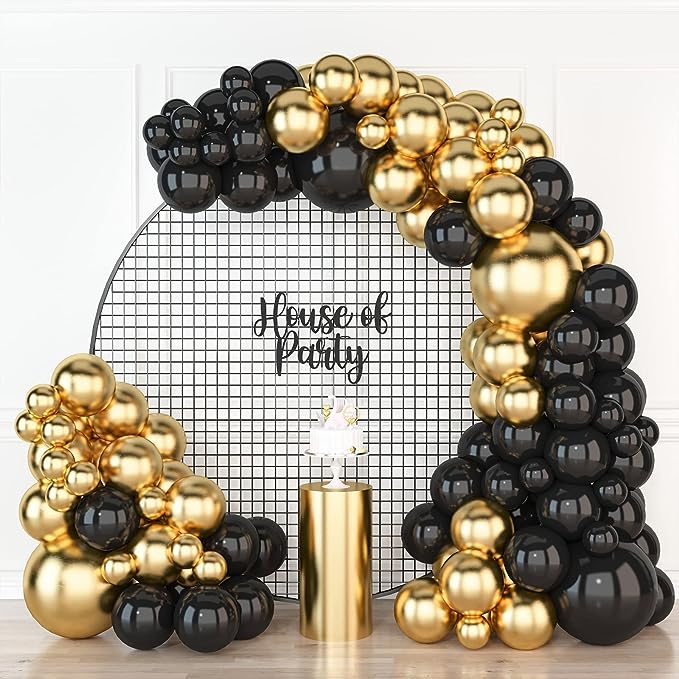
Where to Buy Quality Balloon Supplies: House of Party
When it comes to creating a standout balloon arch, House of Party offers everything you need to ensure your graduation decorations are top-notch. They provide:
- High-quality balloons in various sizes, colors, and materials (latex, foil).
- Balloon arch kits with everything you need for easy assembly.
- Balloon accessories such as strips, pumps, and weights.
- Customizable party decor to match your specific graduation theme.
Whether you’re looking for bold school colors or elegant metallics, House of Party has the right supplies for your balloon arch.
Tips for a Stunning Graduation Balloon Arch
- Plan Your Design: Think about the space and theme of your graduation party. Do you want a bold, colorful arch or a more subtle design?
- Use Balloon Clusters: Rather than attaching individual balloons, create clusters for a fuller look.
- Mix Colors and Textures: Don’t be afraid to mix matte, metallic, and pearl finishes for added dimension.
- Add a Welcome Sign: Incorporate a “Congratulations” sign or your graduation year to make it even more personal.
Conclusion: Make Your Graduation Party Unforgettable
Creating a balloon arch for your graduation party is an easy and fun DIY project that will leave a lasting impression on your guests. By following this step-by-step guide and using high-quality supplies from House of Party, you can create a stunning and professional-looking arch that will elevate the atmosphere of your celebration.
Whether you’re a crafting pro or a beginner, a balloon arch adds that perfect touch of elegance and festivity to any graduation event. Enjoy making your arch and celebrating this monumental achievement!
FAQs
1. How long will it take to make a balloon arch?
Creating a balloon arch can take 2-3 hours depending on the size and complexity. Planning and organizing your materials beforehand can speed up the process.
2. Can I use a balloon arch for other events?
Yes! Balloon arches are perfect for various events like weddings, baby showers, birthdays, and corporate celebrations.
3. Can I create a balloon arch without a frame?
Yes, you can create a free-standing balloon arch using a balloon strip or fishing line to hold the balloons in place.
4. How can I make my balloon arch last longer?
To extend the lifespan of your balloon arch, avoid placing it in direct sunlight or high-heat areas, as balloons can deflate faster.
5. Where can I purchase balloon supplies for my graduation arch?
You can buy balloon supplies from House of Party, which offers everything you need for a high-quality balloon arch, including kits, balloons, and accessories.