

BlueStacks is one of the most popular Android emulators for Windows and Mac. It allows you to run Android apps and games on your computer. While you can easily install apps from the Google Play Store on BlueStacks, sometimes you may want to install APK files that you have downloaded from other sources. Here is a comprehensive guide on how to install and use APK files on BlueStacks.
What is an APK File?
APK stands for Android Package Kit. It is the file format used to distribute and install apps on Android operating systems.
APK files allow you to install apps on Android devices without going through Google Play Store. You can download APK files from various third-party websites and app stores.
Some key advantages of using APK files are:
- Install apps not available on Play Store
- Get early access to app updates
- Install region-restricted apps
- Install older versions of apps
- Install mods and tweaks for apps
However, you need to be careful when downloading APK files from unknown sources as they may contain malware. Only use trusted websites to download APKs.
How to Install APK on BlueStacks
Installing an APK file on BlueStacks is quite easy. Here are the steps to do it:
1. Download the APK File
First, you need to download the APK file of the app you want to install on BlueStacks. You can get APK files from various Android APK download sites such as APK Online, APK Mirror, and more. Make sure to download the APK from a trusted source.
Also check that you have downloaded the correct APK file for the app, compatible with BlueStacks.
2. Locate the Downloaded APK File
Once the APK file is downloaded, locate it on your computer. Usually, APK files are saved in the Downloads folder by default.
3. Launch BlueStacks
Open the BlueStacks app on your computer. BlueStacks will load the Android interface.
4. Install the APK
There are a couple of ways to install the APK file on BlueStacks:
Drag and Drop Method
- Locate the APK file on your computer and drag it to the BlueStacks window.
- Drop the APK file over the BlueStacks home screen.
- This will initiate the APK installation process.
Install APK Option
- Click on the “Install APK” option on the sidebar in BlueStacks.
- A Windows Explorer window will open.
- Browse to the location of the APK file on your computer and select it.
- Click Open. The APK installation on BlueStacks will begin.
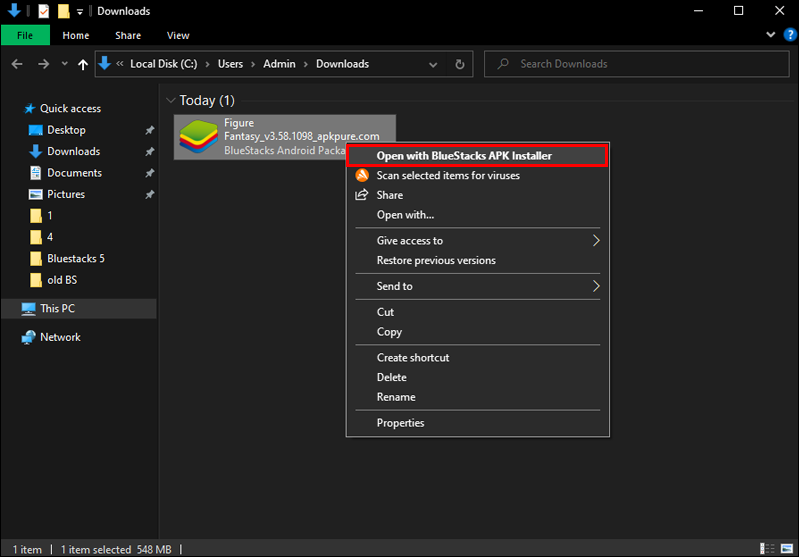
Double Click Method
- Simply double-click on the APK file from its saved location.
- This will also start the APK installation process on BlueStacks.
5. Launch the Installed App
Once the APK is installed successfully on BlueStacks, you will see the app icon on the home screen. Click on the icon to launch and start using the app.
That’s it! This is how you can easily install and use any APK file on the BlueStacks Android emulator.
Troubleshooting APK Installation Issues
Sometimes you may encounter issues while installing APKs on BlueStacks such as:
- App not installed error
- Parsing package error
- App crashes on launch
Here are some tips to fix these problems:
- Check that the APK file is compatible with BlueStacks version and not corrupted.
- Try disabling your antivirus temporarily during APK installation.
- Update BlueStacks to the latest version.
- Repair BlueStacks using the toolbox if issues persist.
- Install the APK in BlueStacks 64-bit instance if 32-bit installation fails.
Also, make sure that the “Unknown Sources” option is enabled in Settings on BlueStacks to allow installation from third-party APK files.
Using OBB Files with APK
Some apps and games have OBB files associated with them along with the APK. OBB files contain graphics, media, and other game data.
Here’s how you can install an APK with OBB file on BlueStacks:
- Download and install the APK file first using any method discussed above.
- Then download the OBB file which is usually a ZIP archive.
- Extract the ZIP folder. It will contain the OBB files.
- Copy this folder to Android/obb folder inside BlueStacks installation directory.
- Now launch the app, it will load correctly with the OBB resource files.
This allows the APK to access the required OBB data files and run smoothly.
Installing Split APKs
Split APKs contain the code and resources of an Android app split into multiple files. To install a split APK:
- Download all the APK parts usually named as app.apk, split_config.apk etc.
- Extract each of these APK files into separate folders on your PC.
- Now copy all these extracted folders into the Android/data folder in the BlueStacks installation directory.
- Install only the app.apk using any of the methods discussed above.
- The app will now combine the split APKs and install them correctly.
This trick allows you to install even very large apps with split APK configuration on BlueStacks.
Tips for Using APKs on BlueStacks
Here are some additional tips to help you install and manage APK files better on BlueStacks:
- Use reputable websites like APK Online, APKMirror, APKPure, APKCombo, etc to download safe APKs.
- To install older app versions, disable auto-updates for that app.
- You can manually update the installed APKs by downloading the latest versions.
- Multiple users can install their own custom APKs by signing in with different Google accounts.
- Use 64-bit BlueStacks instances for installing complex apps and games.
- Add custom APKs to the Game Center in BlueStacks using the + icon.
- Change the install location of APKs under Settings if your C drive has low storage.
Conclusion
Installing APK files gives you more flexibility and control over apps on BlueStacks. You can get access to exclusive apps not available on Play Store. Just make sure to download APKs from trusted sources only. Follow the simple installation steps outlined in this guide and you will be able to use any Android APK seamlessly on your computer with the help of BlueStacks.